Home > Getting Started > User Interface
User Interface
Wizard Mode
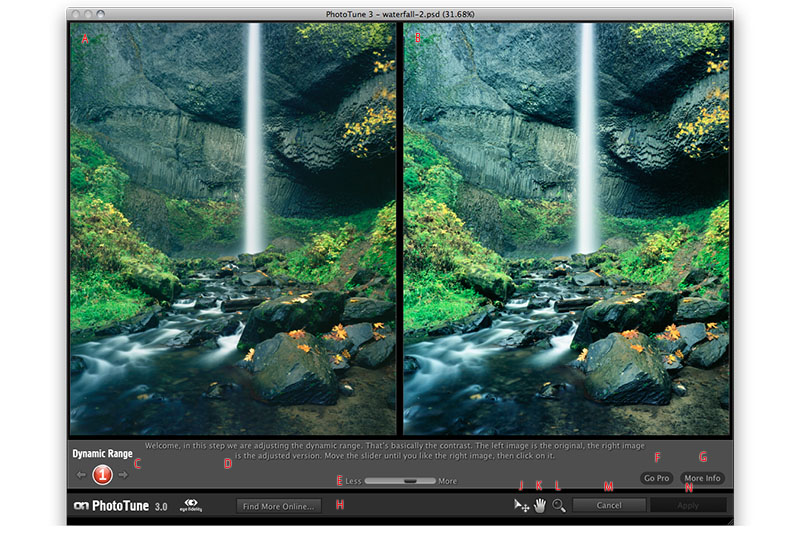
A&B - Preview Window: Shows two different options to pick from.
C - Wizard Step: Shows which step you are in during the wizard process. You can use the back arrow to go back a step if needed.
D - Step Instructions: Give you an overview of how to adjust the current step and what to look for in making your decision.
E - Step Control: Each step may have an options slider or other control that you can adjust to decrease or increase the difference between the left and right preview images.
F - Go Pro button: Pressing this will toggle from the Wizard to the Pro Interface.
G - More Info button: Pressing this will open a floating palette with more detailed instructions for each step in the wizard.
H - Find More Online...: Opens a web browser and navigates to a product specific instruction page.
J - Select (Move) Tool: This is the default tool. Select this tool to select a preview image, moving the Wizard forward.
K - Hand (Pan) Tool: Select this tool to move the image within the preview window.
L - Zoom (Magnify) Tool: Select this tool to change the size of the image in the preview window.
M - Cancel Button: Press this button to cancel PhotoTune and return to the host application.
N - Apply Button: Press this button to apply the current stack to your image and return to the host.
Pro Mode
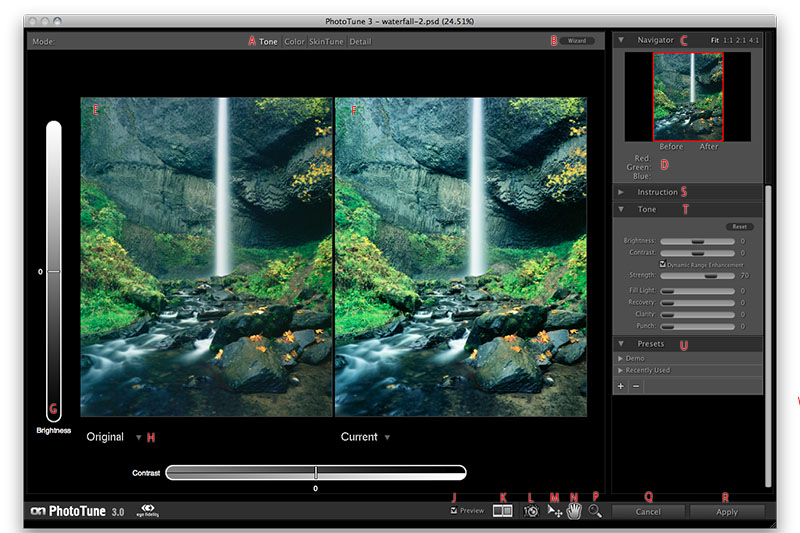
A - Mode Selector: Click on the mode you would like to use, the current mode will be highlighted.
B - Wizard Button: Press this button to use the Wizard to adjust your image.
C - Navigator Pane: Displays a birds-eye view of your image. Allows you to change the zoom ratio and to move around the preview area.
D - RGB Readings: Displays the RGB color numbers for the area under the cursor. Displays both the original and adjusted values.
E - Left Preview: In the default L/R compare preview mode this will display the original image.
F - Right Preview: In the default L/R compare preview mode this will display the adjusted image.
G - Moving Image Controls: You can adjust most common settings in each mode by moving the preview image up and down. These slots will display the control name and value. You can also click and drag in the slot to adjust the setting.
H - Snapshot Pop-up: At the bottom of each preview is the snapshot pop-up. You can use this to select which image state which wish to display and work on.
J - Preview Toggle: Toggles the preview on/off for the adjusted image.
K - Preview Mode Toggle: Toggles between the different preview display modes.
L - Snapshot Tool: Pressing this tool takes a snapshot, saving the current image settings.
M - Select (Move) Tool: This is the default tool. Select this tool to select a preview image, moving the Wizard forward.
N - Hand (Pan) Tool: Select this tool to move the image within the preview window.
P - Zoom (Magnify) Tool: Select this tool to change the size of the image in the preview window.
Q - Cancel Button: Press this button to cancel PhotoTune and return to the host application.
R - Apply Button: Press this button to apply the current stack to your image and return to the host.
S - Info Pane (closed): This pane displays information on adjusting the settings for the current mode.
T - Mode Pane (Tone): This pane changes with each mode, it contains the controls relative to the mode.
U - Presets Pane: This pane contains a list of user saved presets and the controls for creating and deleting them.
See also