Home > Using PhotoTools 25 > Using the Effects Library > Opening the Library
Opening the Effects Library
When you launch PhotoTools you should see the Effects Library immediately at the bottom of your screen. This is the starting point for using PhotoTools. You can resize the library using the handle located at its far right side. Just click and drag to make it larger or smaller. The size of the Library will be retained from session to session. You can also close or hide the Library by clicking on the None option in its mode bar or by using the command-E (Mac) or control-E (Windows) keyboard shortcut.
In the header of the Library is a mode selector. It contains the following Library modes, which you can select by clicking on an option. Each mode changes only the left most column of the Library.
- Categories: Shows a list of categories. Each category contains similar effects, such as Image Optimization or Black & White Treatments. They are organized top-down in the order you typically use them in a workflow. For example you would adjust color and tone using the Image Optimize effects before using a Stylized effect or a Frame Treatment. If you are upgrading from PhotoTools 1.0 this is the same category list you have used before.
- Search: The search mode allows you to search for effects or presets simply by typing in any word that is part of the effect or preset name or description. As you type each letter the search results are narrowed down automatically. You can also filter the results using several options.
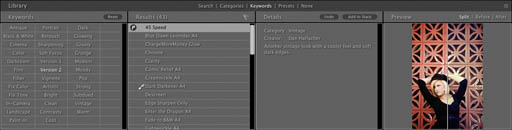
- Keywords: The keyword mode lists an array of keywords that are both descriptive and emotive. You can search for effects or presets by clicking on any number of keywords to narrow down the results.
- Presets: The preset mode lists the presets and their categories, similar to the category mode.
- None: The none mode minimizes (closes) the Library.
See also