|
Home > Using FocalPoint 2 > Aperture Use > Using Presets
Using Presets
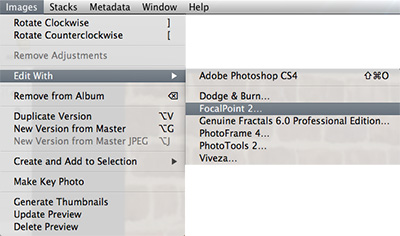
To Apply a FocalPoint preset to an image in Apple Aperture follow these instructions:
- Open Apple Aperture
- Select an image
- Go the Images menu and select Edit With
- Select FocalPoint 2...
- The FocalPoint 2 for Aperture dialog will appear, select a preset from the list and press Apply.
For Details on using the FocalPoint for Aperture dialog look below.
|
 |
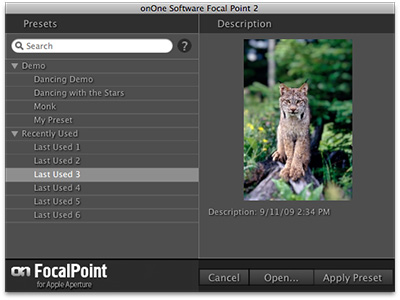
This is the FocalPoint for Aperture dialog. It consists of these controls:
- Search: Type in the name of a preset. The results will appear in the Search Results category.
- Category List: Lists your preset categories. Click on the triangle to open each category, just like the Preset pane in FocalPoint.
- Description: Displays a saved preview of the preset as well as the description for the selected preset.
- Cancel: Cancels FocalPoint 2
- Open...: Rather than applying a preset directly, this option will open your image in FocalPoint so you can manually control its options.
- Apply Preset: Applies the selected preset to your image(s)
 |
Note: Aperture will always create a copy of your image for editing. You can control the file type and options that it creates in the Aperture preferences. |
|
 |
See also
|