Home > Using FocalPoint 2 > Using the FocusBug > Adjusting the FocusBug
Adjusting the FocusBug
Adjusting the Size, Shape and Position
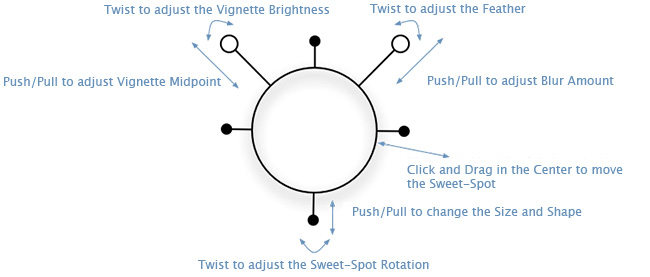
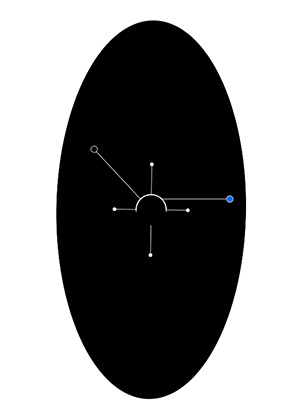
The FocusBug controls the position, size and shape of the sweet-spot. To position the FocusBug make sure you have it selected from the toolbar and that you have the correct FocusBug selected. Then click, hold and drag inside the body of the bug. Place the FocusBug in the middle of the area you want to keep in focus (the sweet-spot).
To control the size and shape of the sweet-spot you will need to manipulate the legs of the FocusBug. The legs are the shorter appendages that extend out of the FocusBug body. On the round FocusBug there will be four legs. On the planar FocusBug there will be only two legs. To adjust a leg click, hold and drag it with your mouse. You will know when you can select a leg by the end of it glowing blue when your mouse pointer approaches it. The length of the legs control the size and shape of the sweet-spot. You can also rotate the legs around the body to change the angle of rotation of the sweet-spot.
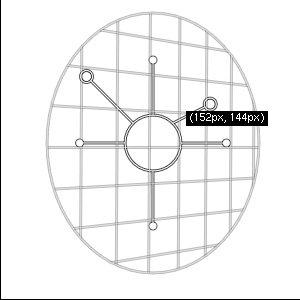
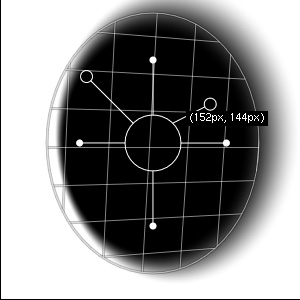
| | Tip: It is often useful to turn on the grid when adjusting the FocusBug. This will allow you to see the exact size, shape and position of the sweet-spot. You can turn on the grid by going to View > FocusBug Grid and selecting Auto or On. The grid is set to Auto by default, meaning it will only appear when you are adjusting the FocusBug. |
Using the Antennae
The antennae of the FocusBug control the amount and type of blur as well as the feather and opacity of the sweet-spot. You adjust the antennae the same as the legs. Click, hold and drag the antenna you wish to adjust.
The right antenna controls the amount and feather of blur. The length of the antenna controls the amount of blur. The longer the antenna the more blur will be present. The angle of the antenna in relation to the body controls the feather or the transition between the sweet-spot and the bokeh. It is best to set the amount to 100% by pulling the right antenna to its longest position and then adjust the feather at this setting. This will make the feather more obvious while adjusting it. Once the feather is set you may adjust the amount to your desired setting.
![]()
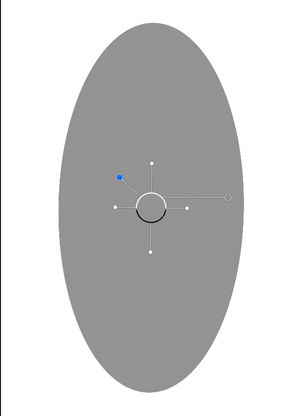
You can lock the antenna so you only adjust one of its variables at a time.
The left antenna controls the vignette function. The length of the antenna controls the midpoint of the vignette, or how large it appears. The angle of the left antenna controls the brightness from light to dark. By reducing the midpoint you may add a subtle amount of blur to the sweet spot as well.
The Optical Quality slider controls the smoothness of the out of focus areas. Lower settings will give more pronounced bokeh while higher settings will give a smoother look to your out of focus areas. To mimic specific styles, you can use the aperture, curvature, and rotation controls. For example, setting the aperture to three blades gives the out of focus areas a triangle shape.
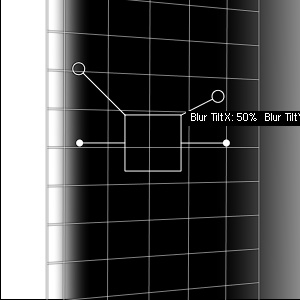
Adjusting the 3-D Tilt
You can also use the FocusBug to tilt the plane of focus just like using a tilt-shift lens or view camera. This will vary the blur on each side of the sweet-spot. To control the tilt click and hold the option (Mac) alt (Windows) key and then click and drag inside inside the body of the FocusBug. You will notice the grid will appear and as you move your cursor inside the FocusBug’s body the grid will tilt in three dimensions. You can reset the tilt by holding option (Mac) alt (Windows) and double-clicking inside the FocusBug’s body.
| Round FocusBug tilted to the right | Round FocusBug tilted to the right with mask visible |
 |  |
| Planar FocusBug tilted to the right | Planar FocusBug tilted to the right with mask visible |
 |  |
![]()
Unlike a tilt-shift lens or view camera movements, FocalPoint can only reduce the amount of sharpness, not improve it.
Adjusting the FocusBug Feather
| Small feather, hard edge | High feather, soft edge |
 |  |
Adjusting the FocusBug Opacity
| 100% Opacity | 50% Opacity |
| |  |
Adjusting the FocusBug Control Appearance
The opacity of the FocusBug itself can be controlled to minimize its interference with the preview image. To adjust the opacity of the FocusBug’s body go to the View menu and select FocusBug Opacity. This has no effect on the image itself, only how the FocusBug control appears. There is a different FocusBug opacity mentioned above.
See also